The definitive guide to project billing and invoicing
Last updated on: June 13, 2022
According to a survey by PayPal, as much as 58% of freelancers have experienced a client not paying them. Hence, implementing an effective project billing process is crucial for your business, as it ultimately ensures you do get paid, and paid properly.
So, here’s The Definitive Guide To Project Billing for freelancers that will help you through a successful project billing process by answering pressing questions such as:
Table of Contents
What is billing?
According to the official Cambridge dictionary definition, billing is the process of preparing, and then sending out bills that ask the clients to pay the amount of money they owe you for goods, or your services and time.
In companies, this process is often handled by the accounting department of a company, or an accounting specialist you’ve hired outside of the company. Yet, freelancers often handle this task on their own.
In any case, there are several project billing types you can implement in your project billing process.
Project billing types
There are 2 main project billing options for projects and tasks you can choose from – charging a flat fee or billing by the hour.
No matter what project billing type you choose, you’ll also have to determine your expected income – this is the amount of money you’ll have to earn in order to pay your bills, cover the cost of your work material and software you use, pay taxes and insurance, but also ultimately make a profit and hit your target annual salary.
💡Clockify pro tip
Want to easily calculate the rates that’ll make sure you cover your expenses and reach your ideal target salary? Here’s an extensive guide on the subject, where you can also use Clockify hourly rate calculator for billing.
There are some basic differences between the two types of project billing you should consider before making your choice:
1. Flat fee
You charge a fixed, flat fee for a specific service – you always charge the same for this service, regardless of the number of hours you put into it.
2. Hourly rate
You charge for a specific service based on the number of hours you’ve put into it.
That’s the gist, and now let’s look at these two project billing types in more detail.
How to charge a flat rate if you’re a freelancer
In order to set flat fees for your services, you’ll need to :
1. Approximate all the time you’ll need in order to finish said project
This includes the time you’ll spend working on the project directly, but also all the time you’ll need to spend on project-related administration and similar tasks (such as commutes, phone calls, email communication…).
2. Define variables
Having a default project fee is fine, but not all projects are equal, even if they’re officially the same type of project – so, you’ll need to define variables that will help you price your projects.
For example, handling the interface design of an application may sound like a one-size-fits-all type of project, but will usually differ in execution and practice. Some such projects will require a more elaborate design, more features included in the interface, or simply, a more demanding client who’s hard to please and will require additional work. No matter the specific project differences, make sure they’re reflected in the flat fee estimate you present to your client.
3. Stick to your predetermined price
Once you’ve decided on a fixed fee that covers your costs, expenses, and ensures you make a profit, stick to it. Negotiating with clients is fine, but you’ll need to cover your costs and expenses, and negotiating the price down once you’ve already made these calculations may make you fall short of your target. If you still feel like your clients will insist on negotiating your fixed price, define a certain price threshold, and make sure you never agree to go below it.
Charging a flat fee for your projects may be a simple way to start your business. But, as your business starts to grow, and more and more variables get introduced to your billing process (such as additional services), you’ll probably want to switch to an hourly rate.
How to bill hourly if you’re a freelancer
Billing by the hour is a more flexible project billing type, as you’ll be able to account for the additional time you spend working, and all the effort you put into your work.
💡Clockify pro tip
Interested to learn about the optimal average hourly rates for your business? Consult our all-inclusive guide on average freelancing & consulting hourly rates.
How to calculate your billable hours
Once you’ve calculated your required earnings per year and the hourly rates that will get you there, make sure you account for the hours you spend working properly.
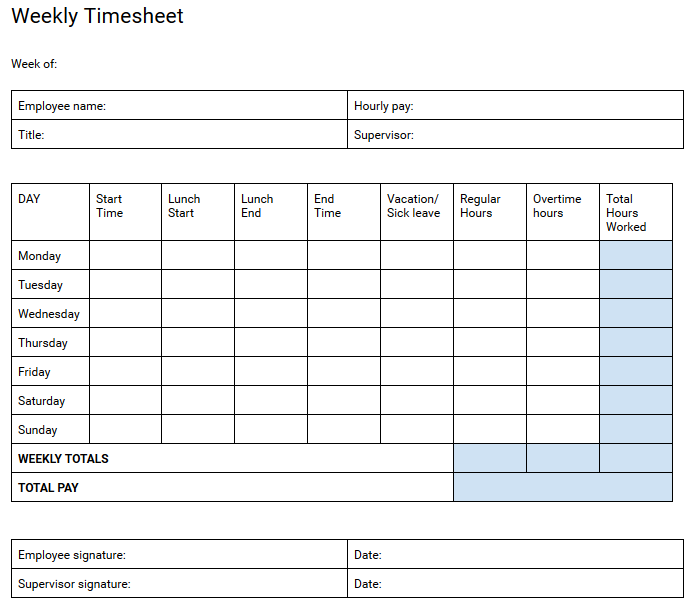
1. Fill out hourly billing templates
When billing by the hour, you can create an hourly billing template that’ll help speed up your time billing process – include data such as day of the week, start and end times for you work, start and end times for your lunch breaks, as well as calculations for your regular and overtime hours.
💡Clockify pro tip
Want several easy-to-use hourly billing templates? You can choose among various free hourly billing templates that record your hours worked per week, two weeks, or month with these free timesheet templates we made. Or, you can try out our free online timesheet calculator.
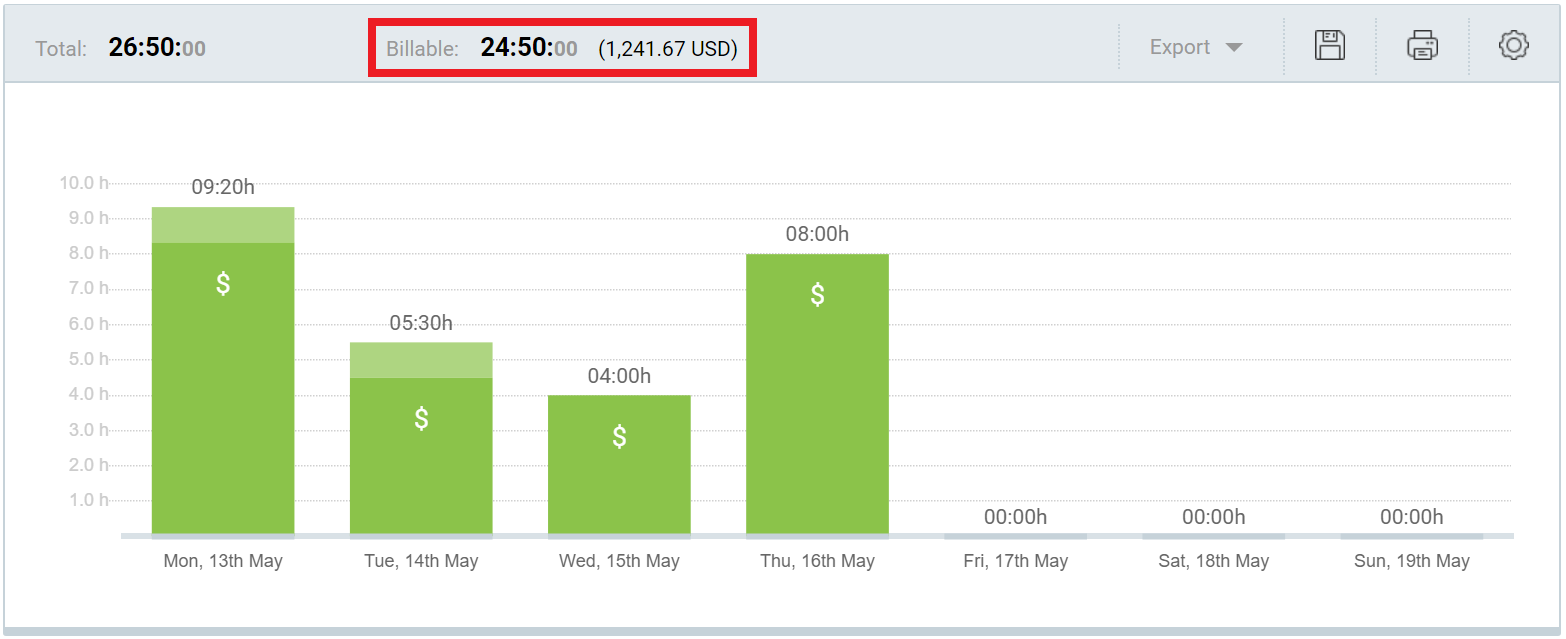
2. Track your billable hours
Hourly billing templates assume all your hours are billable, but you will want to put extra emphasis on your billable hours, i.e. the hours you’ll charge your client. Remember, you may spend 150 hours per month working for clients (billable time), but you’ll spend more than that on administrative tasks for your business (non-billable time). This is where a time tracker app with billability options can help you – you’ll be able to track your billable hours automatically, but also analyze where you spend time in total (for example, how much time you spend on billing clients and administrative work).

To track and highlight billable time with our free time tracker Clockify, you’ll need to simply:
- Define your hourly rate
- Define your project and project-related tasks
- Define the client associated with that project
- Add the description of your project-related activity in the Time Tracker section of the app
- Associate it with the right project and task
- Make sure the project-related activity is marked as billable
- Start the timer or add the time you’ve spent on this activity manually
- View your automatically calculated earnings (hourly rate X the total time spent on the project) in the Reports section of the app
- Generate Reports for specific projects, clients, time periods by filtering available parameters
- Add the earnings to your invoice or export a Report as CSV, Excel, or PDF files and send it to the client
💡Clockify pro tip
If you’re interested in learning more about the subject of tracking billable time, check out our guide on how to calculate billable hours.
Hourly billing for freelancers. How do you do it?
Billing hourly is a flexible project billing process, so you’ll be able to tweak it to fit your own needs – here are some actionable tips from freelancers on this Reddit thread who are already well versed in the subject:
- Round up your time – If a conference call lasts 31 minutes, but you have to stop what you’re currently doing, and read some prep documentation before taking the call, you should round up this item in your report to at least 45 minutes. Rounding up to 15 minutes is the norm, but you can also round up to the nearest 6 minutes, nearest 1 hour, or any other number you find suitable – if you’re looking to significantly round up your billable hours in order to cover for preparation tasks, make sure you make this clear to the client beforehand.
- If you have to fix your mistake, don’t charge for it – Simply explain to your client that you’ve made a mistake you’ll fix at no charge and include this item in your bill as “no charge“.
- Inform the client about extra expenses – If you plan to track time on tasks clients otherwise wouldn’t expect you to charge for, let them know and make sure you clarify your reasons.
- Clarify all items in your bill – Clients may be curious about certain items in your bill, so minimize subsequent emails and phone calls by adding additional notes about ambiguous items. Always include your hourly rate and total billable hours tracked, so that clients can check the total bill too, if they want to.
How to bill clients if you’re a freelancer
Once you’ve determined fair hourly rates, worked hard for a couple of clients, and tracked your billable time, it’s time to convince your client to – pay what they’re due. In order to do so, you’ll need to learn how to make straightforward invoices, but also how to “help” clients pay you.
How to make an invoice
Making a client invoice is simple enough – you’ll need to include basic invoice information, with an emphasis on what you worked on or provided, at what hourly rate, and the total amount the client needs to pay you.
You’ll also need to have the following other elements in mind when making an invoice for your clients:
Make sure you have accurate records of your work – unless you do, you won’t be able to invoice correctly. Considering that it’s difficult to remember exactly what you’ve done at the beginning of the month (once you reach the end of the month), it’s best that you track time as you work. Include your time for each task related to the project in the invoice.
Make sure the invoice is transparent – include all the necessary information:
- make sure you make the calculations that led you to the final sum clear
- itemize your services and products sold to the client
- specify payment terms
- include invoice information (invoice number, issue date, due date…)
- include additional information (return policy, a quick thank you note for paying on time, a short list of other services and products you offer)
Decide how often you want to invoice – if you offer both products and services, you may decide to invoice more frequently for products than services, or make other specific arrangements with your clients. One of the most common solutions is to invoice on a monthly or bi-weekly basis – whatever invoicing schedule you choose, make sure you don’t leave too much time between invoices, in order to sustain a regular cash flow.
Decide when you want to receive payments – once you’ve decided how often you want to send out invoices, you also need to decide how often you want to receive payments. The most common solution is to require payments 14 days after the client has received the invoice – but, this final arrangement will depend on your own agreement with the client(s).
Decide on the payment method – if you want the clients to pay you in agreed intervals, make sure you get out of your way to make payments easy for the client and decide on a suitable payment method. Propose and be open to a number of possible payment solutions, from credit cards to PayPal.
Create a graphic design invoice – by making your invoice appealing, with all the necessary data highlighted, you’ll increase your chances of getting paid. So, choose an attractive and legible font, sharp shapes, clean colors, and make sure you include your company or brand logo. If there are any details you wish to highlight (such as the total amount due, or the services you’ve provided at “no charge”), put them in bold.
Create professional invoice templates – digital, modern-looking formats work best (they also imply you work with the best, cutting-edge technologies when handling projects). It’s best that you try a free invoicing tool to help you streamline your invoice workflow – such tools offer invoice templates you can easily fill out with new information whenever you need no matter whether you quickly have to create a single invoice or multiple invoices.
Streamline accounting transactions – in the end, each time you receive a payment after successful invoicing, you’ll need to record it in the accounting records of your business. This way, you’ll make sure your company’s accounting transactions are clean and compliant to your countries business laws and regulations.
💡Clockify pro tip
Want to streamline your accounting transactions and learn how to bill clients online? Consult our list of the best accounting tools.
How to encourage clients to pay
Considering that about 58% of freelancers in several freelance capitals have experienced not getting paid in their career, you’re also likely to encounter clients who are reluctant to pay. Although you cannot guarantee no client will ever refuse payment, you can minimize these instances by following certain rules on how to bill clients:
- Make payments easy for the client – if you make the payment process easy, clients will be more likely to pay. Choose an easy payment method (such as PayPal), or comply with the client request about the payment method upon your first meeting.
- Offer benefits for fair payments – offer discounts for early payment, and/or include an extra, late fee for people who want to pay after the discussed and agreed upon deadline.
- Request partial upfront payment – if you’re working on a larger project, it’s best that you ask the client to pay part of the money in advance. Once you receive an advance, you’ll prove the client is serious about this project (and about paying you in full eventually). You’ll also be able to cover initial project costs and expenses. Such upfront payment is also known as a retainer.
- Send bills more often – when it comes to the question of how to send an invoice to a client, the answer is – more often is always better. Smaller and more frequent bills make the sum easier to swallow for the clients. When you send a $600 bill every two weeks, you’ll be less likely to intimidate the clients (and more likely to get paid) than if you send a $3,600 bill after three months. Plus, you’ll find out early on whether the client is trustworthy or not – you’ll probably find being skimped for $600 after two weeks of hard work much less terrible than being skimped for $3,600 after 3 months of hard work.
- Maintain great client relationships – a client who is satisfied with your service will be more likely to pay on time for said service. When discussing the project send straightforward but friendly emails, and comply with the client’s requests (as long as they’re reasonable requests).
How to ask a client for more money
If you realize that you need more resources to cover project costs and expenses, you’ll need to notify your client. If the time you’re realistically spending on this project is disproportionate to the money you’ll receive, it’s best that you fully commit to charging an hourly fee – you’ll always be able to account and bill for any additional hour you spend working on this project.
Apart from that, here are some other points you should consider:
- Approach the matter with confidence – unless you do, the client may dissuade you from your request. Some clients may be reluctant (or simply refuse) to pay more at first, but you should remain firm in your request – explain that you’ll be willing to work for the original budget, but that you won’t be able to provide the additional services and hours the client requested at the original price.
- Don’t wait for the final invoice to bring up the increase – instead, contact the client in a direct, prompt and straightforward manner as soon as you realize you’ll need a bigger budget, or as soon as they ask for additional project tweaks your original contract doesn’t cover.
- Justify your request for a budget increase – first, explain what services the original budget covers, and then clarify what items you’ll need more money for. Provide specific reasons, and then disclose your new hourly rate/total amount.
- Document all changes – whenever you and your client make a new budget agreement document these changes in your contract (or simply make a new one). Include the new services you’ll be providing, and record the price changes.
How to ask the client for payment politely
If you realize all payment deadlines have been breached and you still haven’t been paid, you’ll need to push matters forward yourself – here is some invoice late fee-wording tips you can try when you want to ask the client for payment politely:
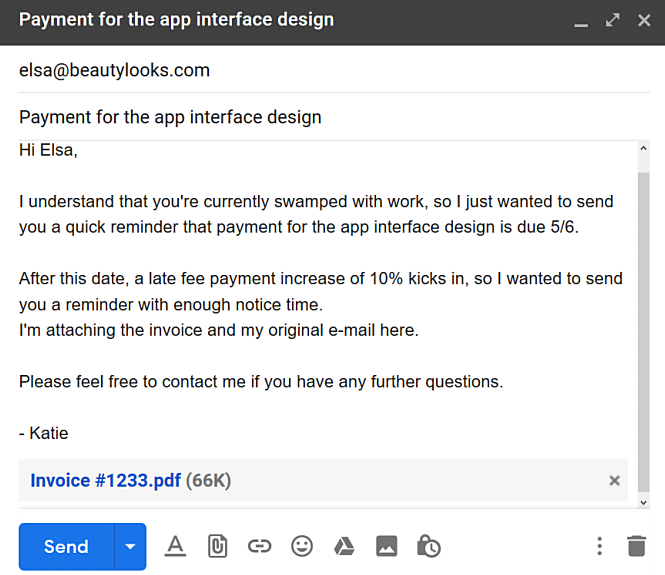
- Send a firm (but friendly) email asking for payment – be straightforward about payment details (the amount, the payment method, etc.), but friendly, in order to maintain a good relationship with your client. For the best effects, include the price in your email subject. Include a call to contact you with further questions, if any, at the end of the email.

- Send a follow-up email after two weeks if you receive no response to the first email – be firmer in this follow-up email, but retain a friendly undertone – assume they’ve been busy, attach your invoice again, and the original e-mail. You can also install an extra fee for your client if he/she doesn’t pay you before a certain deadline.
- Make a phone call – If both your emails end up being ignored, you should resort to a clear but friendly phone call. Call your client, politely introduce yourself and remind him/her of the project you worked on, and clarify you’ve sent 2 emails thus far, but received no response. Always assume in the phone call that the client simply hasn’t seen your emails – you’ll imply that you trust your client, and perhaps get an (honest) response your emails really did go to the spam folder. Remind the client of your payment agreement (due date and late fee details included) and make further arrangements for the payment.
In the end, these steps won’t guarantee you’ll get paid (there’s always going to be that one client who won’t pay you no matter what you do), but you’ll encourage most honest clients to make their payments, while also keeping a good business relationship with them.
Conclusion
When you’re a freelancer, billing for your hard work often seems like more hard work – you’ll likely encounter clients reluctant to pay you after you’ve provided your services, or you’ll need to ask the client for a budget increase (which is rarely a request they want to hear).
But, if you offer precise information on your hourly rates and tracked billable hours in your invoice templates, act friendly but firm in your email and phone conversations with the client, as well as offer multiple easy payment solutions, you’ll significantly increase your chances of getting paid.